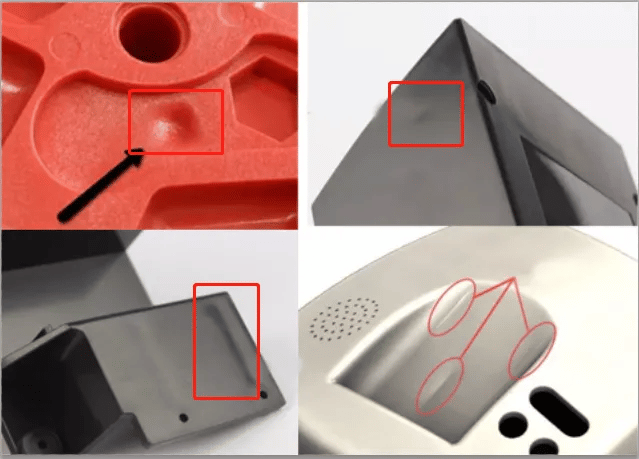
A sink mark is a phenomenon in which the surface of a molded product is slightly concave due to shrinkage. Molded products with external surfaces may result in poor quality. Sink marks may not appear on the surface of the part, and bubbles (cavities) may form inside the part. This is called a void. This phenomenon occurs because molten plastic resin for both sink marks and voids causes abnormal shrinkage in the process of cooling and solidification.

Here, we will introduce tips for mold design to reduce the occurrence of sink marks, as well as challenges and solutions for measuring sink marks.
What Is Sink Mark?
A sink mark is a condition in which the surface of a molded product is indented. This defect occurs when the molten resin cools, solidifies, and shrinks in the mold due to a lack of absolute amount of resin in the mold. In other words, if the stiffness of the surface is weak compared to the force to be contracted, the surface will be concave and become a sink mark. The occurrence of sink marks is mainly caused by a high volume shrinkage rate, especially in the wall thickness. Therefore, depending on the situation, you can avoid sink marks if the cooling method is not significantly different between the inside and the outside. In general, the following are measures against sink marks in the resin molding process.
- Reduce the resin temperature
- Reduce the mold temperature (raise it in some situations)
- Reduce the thickness difference of the product
- Increase injection pressure
- Increase the injection packing capacity to increase the packing time
By the way, if the rigidity of the surface is strong compared to the force to be contracted, voids will occur in the central part of the product.
Measures Against Sink Marks In Mold Design
When the material and process are decided, there may be a limit to how much sink marks can be taken in the molding process. Here are three measures against sink marks at the mold design stage.
Reduce The Thickness Difference
The part where the difference in wall thickness of resin molding is large will cool down slowly compared to the part where the thick wall thickness is thin. In such areas (red circle in the figure below), sink marks are likely to occur. In this case, by changing the wall thickness of the resin molded product, the occurrence of sink marks can be suppressed. For example, changing the thickness of B in the figure to the same as the thickness of A (or less than or equal to 70%) can avoid the occurrence of sink marks.
Slow Wall Thickness Changes
In the figure below, the red circles are more likely to cause sink marks. Reducing the wall thickness difference can suppress the occurrence of sink marks, but for example, in order to maintain strength, it may not be possible to reduce the wall thickness difference. In these cases, slow the change in wall thickness. If you place a corner R in the part, the change in wall thickness will be gradual.
If these measures are not possible due to design, in addition to responding by product design, it is also important to take measures such as installing cooling pipes in areas where heat easily accumulates, and using materials such as beryllium copper with high thermal conductivity for molds.
Cut Out The Meat Or Rib
If the parts are complex and require changes in wall thickness, the occurrence of sink marks can be suppressed by providing meat pluckers or ribs.
For example, if you flesh out a thick-walled cross section of a part and reduce the thick-walled area, the temperature change will be smaller. If you need the same strength as the thick walls, you can apply a cross-hatch rib pattern inside the meatless area to avoid sink marks while maintaining strength. In addition, in order to suppress sudden pressure changes in the mold, it is also effective to apply a gradual change in wall thickness and chamfering.
Conventional Sink Mark Measurement Issues
Sink marks on resin-molded parts are not only cosmetic defects, but can also be shape defects. In addition, it is possible to investigate the cause of defects such as pressure, amount of injected material, temperature, etc. during molding by inspecting and measuring the shape of the sink mark. Traditionally, height gauges and coordinate measuring machines have been used to measure sink marks. However, there were the following measurement issues.
Height Gauge Measurement Challenges
The height gauge can be combined with a dial gauge to make height measurements. Since the measurement is limited to points and the overall shape is not known, it is not possible to grasp the overall state from a bird’s-eye view. In addition, in the case of soft parts, the part deflects due to the measurement pressure and cannot be measured accurately. In addition, stable and highly accurate measurement cannot be performed due to variations in measurement results by humans and errors of the measuring machine itself.
Measurement Challenges for Coordinate Measuring Machines
For example, if the area of the sink mark area is as small as 1 mm2, it is extremely difficult to create a virtual surface by aiming at that part with a probe and measuring it accurately. In addition, when measuring the three-dimensional shape of a small part, the number of measurement points is reduced, and it is difficult to grasp the shape accurately. In addition, it requires a lot of effort, such as aggregating measurement data and collating it with drawings.