Quality control is a major concern for importers who want to import a large number of products from the manufacturers, quality check is necessary at this time. To save time and cost, AQL sampling is usually adopted during quality inspection. In this guide, we’ll introduce what is AQL and how to use AQL table in sampling and quality inspection, you can also use the AQL chart directly included in the article.
What is AQL? - Why Use AQL Sampling?
AQL stands for Acceptance Quality Limit, it is defined as the average quality level of the worst process that can be allowed when a continuous series of batches are submitted for acceptance. In ISO 2859-1, its definition is exactly “The quality level that is the worst tolerable”. AQL sampling is widely used in the quality inspection of products in various industries, and different AQL standards are adopted in the inspection of different substances. In AQL sampling, given the same samples, the smaller the value followed AQL, the fewer the number of defects allowed, indicating that the higher the requirements on product quality. Compare to the inspection of 100% of orders, AQL sampling saves time and money while still provides an accurate look at an order of goods.
AQL Chart (Table)
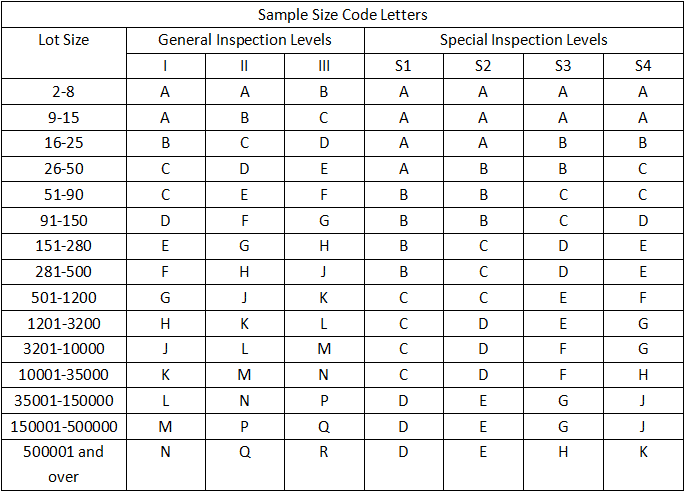
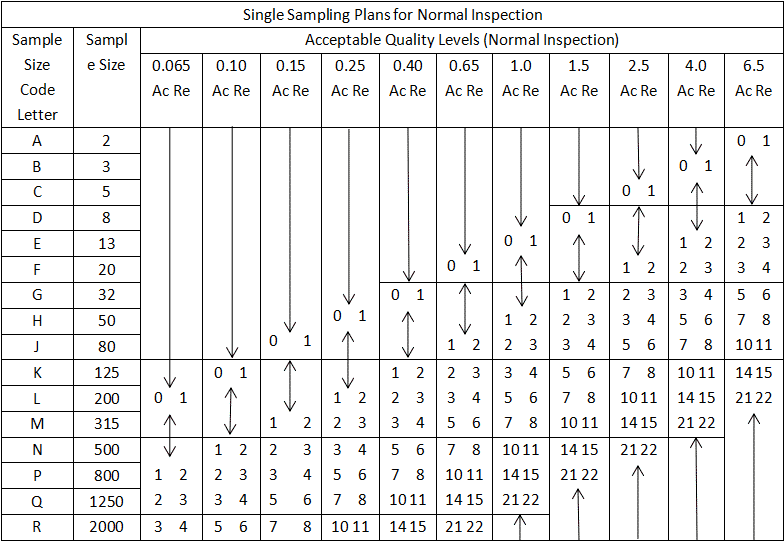
Here is the AQL chart, a QC-industry standard derived from the American National Standards Institute (ANSI) and the American Society for Quality (ASQ). In the chart, you’ll see lot sizes, general inspection levels and special inspection levels. On the second chart, you’ll find sample size code letters, sample sizes, acceptable quality levels, accept maximums and reject minimums.


How to Use AQL Table in Sampling and Quality Inspection?
1. What are the General Inspection Levels? General Inspection Levels including I, II, and III. The level you choose is the primary factor that determines how many pieces to be checked. Level II is the most common selection for general consumer products, Level I means fewer quantities and Level III means more quantities.
2. What are the Special Inspection Levels? Special Inspection Levels including S1, S2, S3, and S4. Using special levels will give you a smaller sample size than any of the General levels do. Special Inspection Levels do not generally apply to the entire inspection, but only apply to specific types of tests on the quality inspection checklist.
3. What are AQL Levels? AQL levels such as 0.065 and 1.0 represent the AQL percentage you selected for your product, or to say, the maximum percentage of defects you are willing to tolerate over the course of many inspections. There are three types of defects:
– Major: defects that affect the functionality of the product or might otherwise lead to returns from customers. You can use 2.5% for major defects.
– Minor: defects that are only slight deviations from your specifications, but don’t affect product function and aren’t likely to result in customer returns or complaints. You can use 4.0% for minor defects.
– Critical: defects that might pose a safety hazard to the consumer. You can use 0% for critical defects.
Here is an example for introducing how to use the AQL table in sampling and inspection (described in the video of Asia Quality Focus).
We’ll use the example of an order of LED light bulbs to keep it simple. If you have an order of 960 bulbs that you need to be inspected prior to shipping, and you want to know what sample size to use during the inspection. First, look back at the first AQL chart. Find your lot size, 960 pieces, in the range of lot sizes shown. If you look at the lot size range, it is in 501 to 1200, you’ll see three general inspection levels: G1, showing the sample size code “G”, G2, showing the sample size code “J”, and G3, showing the sample size code “K”. We’ll stick with the general inspection levels, since you’ll typically use these for inspection, rather than special levels. And let’s say you want a relatively large inspection scope, but you’re working on a budget. So you choose G2-level inspection with a sample size code of “J”.
Now, let’s turn to the reverse side of the AQL chart. Find your lot size letter “J” among the list shown on the left. You can see that the sample size corresponding to “J” is 80 pieces. So out of your total lot size of 960 bulbs, you’ll want to pull a random sample of 80 bulbs to inspect. And remember, you’ll want to pull samples from different parts of the lot. So if the finished bulbs are packed in cartons, be sure to pull samples at random from multiple cartons at the front, rear, top, and bottom of the lot. Otherwise, you might skew the results of your inspection.
The last step in using the AQL chart for inspection involves determining the AQL, the maximum number of defects allowed in the sample for inspection to pass. Let’s look at the reverse side of the AQL chart again. Notice that the chart shows a row of acceptable quality levels along the top. You want to determine the number of critical, major, and minor defects to allow. Here we apply 0% for critical defects, 2.5% for major defects, and 4.0% for minor defects.
An AQL of zero for critical defects is most common. So let’s assume inspection will fail if you discover a single critical defect with the order. Now look for an AQL of 2.5, a common standard used for major defects when inspecting consumer products. You’ll see two numbers where the sample size row and AQL column meet in the middle: “5” on the left, showing the maximum number of defects acceptable, and “6” on the right, showing the minimum number of defects that will result in a failing inspection of this sample size. Now you know that if you find more than five major defects in your sample of bulbs, the order fails inspection. Look back at the AQL chart once more and find your sample size of 80 pieces. Then find the AQL 4.0, which is commonly used for minor defects when inspecting consumer products. In the middle, you find the maximum number of acceptable defects is “7” and the minimum rejected number is “8”. So if you find more than 7 minor defects in the sample during the inspection, the order fails inspection.